| The Bretonnian army can make use of a powerful special formation: the Knightly Lance. The Lance is a formation of Bretonnian Knights, consisting of a single valiant Knight in the front, with two Knights behind him, three behind them, and so on forming a pointed wedge. At full charge the Lance can pierce through the enemy ranks and send foes scattering from the field in rout. In a Lance formation the unit gets a rank bonus depending on the number of models in the unit as follows:
A unit of Knights can deploy in Lance formation at the start of the game. Alternatively, a unit of Knights can adopt Lance formation during their Movement phase by reforming. The leader (the model that will be at the tip of the Lance) remains where he is. He may be turned around to face any direction and the unit is rearranged around him. Knights in Lance formation can adopt a normal formation in the same way, the unit reforming around the leader. A reforming maneuver takes a unit's entire Movement phase, so a unit which forms into or out of a Lance cannot move further that turn. When arranging the Lance formation, the unit's Champion is always placed in the leader's position. If the unit contains one or more characters then the most important must be the leader (Dukes first, then Paladins). The unit's Standard Bearer, Musician, Champion and any other characters are placed as near to the leader as possible. These models must be placed on the external edge of the formation, in a position where they can fight. 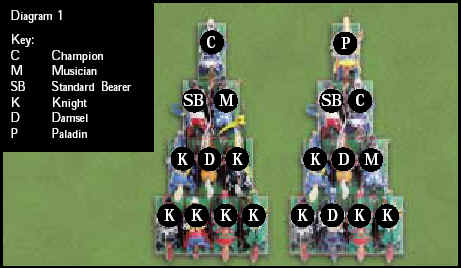
The exceptions to this are Damsels and Prophetesses. The Bretonnian player is allowed to place these vulnerable models in the center of the Lance, in a position where the enemy cannot get in base contact with them (see diagram 1), if possible. This is because the Knights would always gallantly defend the ladies at the cost of their own life. If at any point there aren't enough Knights left to shield the ladies, then they will have to move into an exposed position. Note that the Knights in front of the damsels will block their line of sight, stopping them from casting magic missiles and other spells that require a line of sight to the target. The rearmost rank may be lacking sufficient Knights to fill it. In this case, place the models on the edge of the formation so that they can still fight (note that this is an exception to the normal rules, where spare models in a rear incomplete rank must be placed as centrally as possible). A Lance can maneuver by wheeling forward as normal, measuring the wheel from the widest complete rank. The Lance cannot turn, but it can move sideways or backwards counting every inch moved as two. It can also wheel backwards, always counting every inch moved by the rearmost complete rank as two. The Lance can march move only when moving/wheeling forward. In order for the Lance to charge, the leader must be able to see the target - it does not matter whether other models can see or not as they simply follow their leader. The Lance is allowed only one wheel during a charge, as normal. Because of its unusual shape, a unit in Lance formation could move forward and come into contact with enemies that it couldn't charge because they were out of sight of the leader at the beginning of the move (see diagram 2). 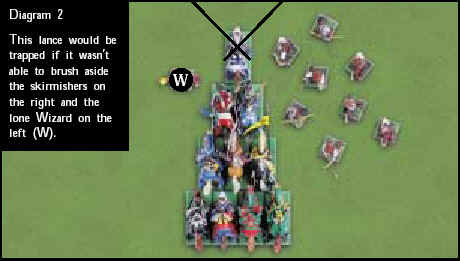
Normally a unit cannot move within 1" of an enemy without charging, and therefore the Lance in this situation has to stop before the enemy and cannot move forward. In effect, it is trapped! The only solution is for the Lance to move backwards or to reform, getting ready for the incoming enemy charge. This is fine, being an inherent weakness of the otherwise powerful Lance formation, and feels all right as long as the enemies in question are solid units. However, it seems wrong that light units such as skirmishers and single characters should be able to trap the Lance (it's much easier for them to do so because of their great mobility). To solve this problem we introduce the Make Way, Peasants! rule. When a Lance formation moves forward (including wheeling forward and charging forward) and comes into contact with an unengaged light unit that the leader could not see at the beginning of the move, then the light unit is moved slightly aside, in order to create just the necessary space for the Lance to move through. A unit of skirmishers that is split into two parts as a result of this must go back into a legal formation in their next Movement phase. For 'light unit' we mean units of skirmishers, as well as single models with a Unit Strength of 1 or 2. CHARGING AGAINST THE LANCE A Lance formation has no flanks as such the long sides of the wedge are counted as its front. A Lance does have a rear and its rear arc is measured from the last complete rank. Charging it in the rear will have the same devastating effect it has on normal units. 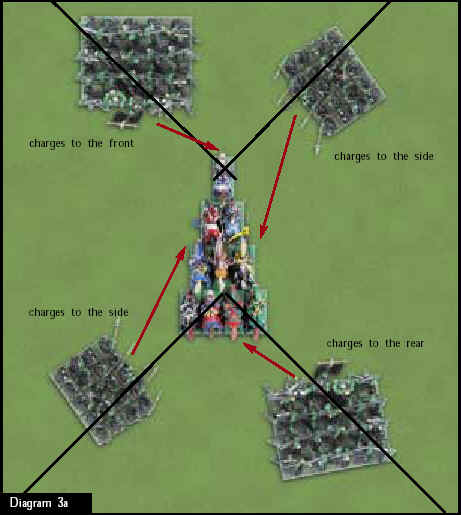
Enemy units that are mostly in the arc of sight of the leader of the Lance must charge the Lance to the front of the model at the head of the Lance, if the front is free (see diagrams 3a and 3b). 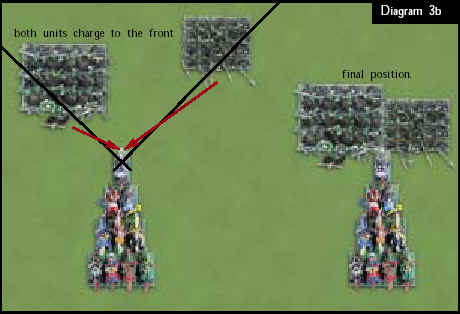
By 'mostly' we mean having the majority of the models in the unit within the arc of sight of the Lance's leader (see page 46 of the Warhammer book). If the front is already engaged in combat from a previous turn, then such units can charge the Lance's closest side (see diagram 3c). Enemy units that are not in the arc of sight of the Lance's leader can charge against the Lance's closest side or against the rear if they are mostly in the Lance's rear arc (see diagram 3a). 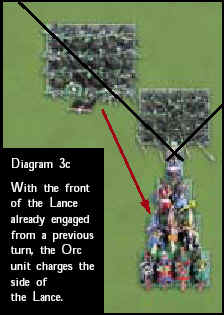
An enemy charging the sides of the Lance does not count as charging the flank of the unit, therefore no bonuses are earned on combat results, and no Panic test is required when already engaged in combat. If a Lance is charged from the side, the enemy is aligned against the side of the Lance formation. 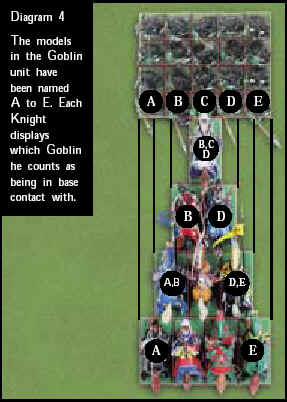
When charging, the Lance formation is positioned against the enemy unit with the leader in contact and the wedge arrayed behind him. This represents the moment of contact - the Lance could pierce the enemy ranks and break through, or the Knights could be halted by the enemy's stout resistance. All the models at the edge of the Lance can fight if there are enemy directly in front of them and no friendly models are in the way, as shown in diagram 4 (you can download a detailed movement/combat tray from our website at games-workshop.com). All enemy models directly in front of the wedge can fight back against models that could have attacked them. All fighting models are considered to be 'touching' the enemy where such a distinction is called for. In the case of multiple fights, enemy models aligned against the side are allowed to fight, and models directly in front of the Lance can fight if there are no friendly models in the way as shown in diagram 5. In this example model A can fight, but model E cannot fight because there are friends between him and the Knights directly in front. The Knights facing models in both enemy units can fight either the ones to their front or the ones to the side if they can draw an unobstructed line to them, and they can divide their attacks if you prefer. 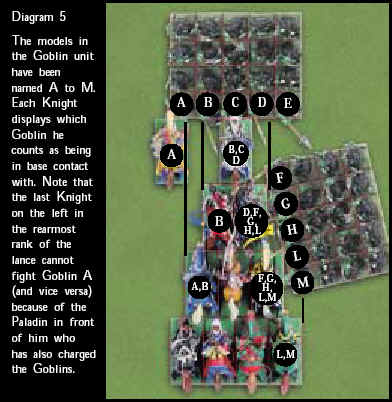
Casualties are removed from the rearmost rank in the usual manner, assuming that Knights who fall in combat are replaced by those pushing forward from behind. When removing casualties, take models from the center of the rearmost rank first and leave models at the edge of the formation so that they can continue to fight. If a character is slain, his position must be taken by another model from the rear ranks of the lance. Knights in a Lance formation cannot lap round an enemy's flank as can a regular unit, nor can the enemy lap around a Lance formation. |