Work out each combat one at a time – resolve the fighting for all of the troops involved in one combat before moving on to the next combat. A combat is often a fight between a single unit of troops from each side, but it is possible that several units, monsters and Heroes may become involved. In the case of several combats being fought at once, the player whose turn it is determines the order combats are resolved. 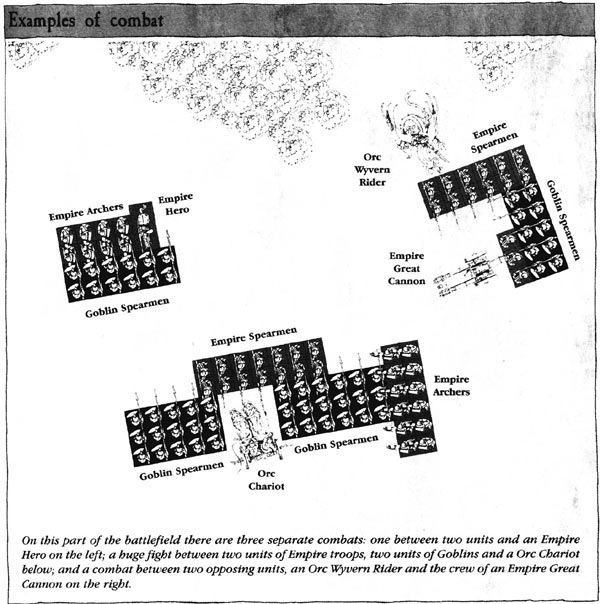
So long as fighting units are interconnected, they are participation in the same combat. All the combat results for such a combat are worked out at the same time. In the desperate hack and slay of close combat the advantage goes to the best and fastest warriors, or those who have gained the extra impetus of charging into combat that turn. To represent this, combatants strike blows in a strict order. Troops who have charged that turn automatically strike first. Otherwise, all blows are struck in strict order of Initiative (I). Combatants with a higher Initiative strike first followed by those with a lower Initiative. This is important because if a model is slain before it has a chance to strike, it obviously cannot fight back. Striking first is a big advantage, which is why it is better to charge your enemy rather than allow him to charge you. If opposing troops have the same Initiative then the side which won the combat in the previous turn may strike first. If this doesn't apply, you should roll a DG and the player who scores highest goes first. For example: A bunch of Orc Boar Riders charges a group of Elf Spearmen. The Elves have an Initiative of 6, while the Orcs only have Initiative 2. The Orcs strike first because they charged. Next turn, the Elves will go first because of their higher Initiative.
If a model is touching more than one enemy, it can choose which to attack. If a model has more than ~ 1 Attack, it can divide its Attacks as the player wishes : so long as this is made clear before rolling to hit. For example, if faced with an enemy Hero and an ordinary enemy warrior you might decide to attack the warrior because he is easier to kill, or you could take the outside chance of slaying the Hero. In the case of cavalry mounts that have their own Attacks, such as Warhorses and Giant Wolves, the rider's Attack and the mount's Attack are worked out separately. This means that some cavalry models have two lots of Attacks: the rider's Attacks and the Attacks of his mount.
To see whether any hits are scored, roll a D6 for each model fighting. If you have more than 1 Attack with your troops then roll a D6 for each Attack. For example, 10 Elves have 1 Attack each so roll 10 dice, but 10 Minotaurs have 3 Attacks each so roll 30 dice. The dice roll needed to score a hit on your enemy depends upon the relative Weapon Skills of the attacker and his foe. Compare the Weapon Skill of the attacker with the Weapon Skill of his opponent and consult the To Hit chart below to find the minimum D6 score needed to hit.
If you look at the chart, you will see that if your warrior's Weapon Skill is greater than that of his enemy, you hit him on a dice roll of 3+. Otherwise your model will hit on a 4+, unless the enemy's Weapon Skill is more than double yours, in which case you require a 5+. Sometimes modifiers apply to these rolls, but, unless it is specifically stated that hitting a model is impossible, an unmodified roll of G always hits. When you are fighting against cavalry, all blows are struck against the rider using the rider's Weapon Skill and never against the mount. A mount fights using its own \Weapon Skill if it has its own Attack. Troops lining up behind a wall, hedge or other obstacle can adopt a position to defend it. The front rank is moved right up against the obstacle to show this. Enemy wishing to attack the defenders can do so by charging them as normal. Attacking models don't have to physically cross the obstacle, indeed they are unable to whilst it is defended. Instead, the front rank is positioned on the opposite side to the defenders. If attacking an enemy behind a defended obstacle, a 6 on a D6 is needed to hit them. This penalty applies to a unit attacking troops that have already taken up position behind the defended obstacle. The penalty does not apply to both sides in the combat even though the obstacle lies between them. The defending side has the advantage of already taking up a good position with its weapons sticking out or over gaps in the hedge or wall, whilst the other side must mount an assault in the face of a wall of sword points or spear tips. Flying models attacking enemy behind defended obstacles ignore the penalty. The attacking side continues to suffer the '6 to hit' penalty until it wins a round of combat. Once the attackers have won the combat, they are assumed to have climbed over or onto the wall, and further combats are fought as normal. Chariots cannot charge models across defended obstacles, they would just be smashed to pieces. Not all successful hits are going to harm your enemy - some may rebound from bones or bounce off tough hide, while others may cause only superficial damage which doesn't prevent the creature fighting. Once you have hit your foe, you must toll again to see whether your hits inflict wounds. This procedure is the same as is described for shooting. Consult the Wound chart above, cross referencing the attacker's Strength with the defender's Toughness. Both values appear on the profiles of the creatures that are fighting. The chart indicates the minimum score required on a D6 to cause a wound. Note that where the table shows an 'N' this indicates that the target is too tough to be hurt. N stands for no effect. Unlike hits from shooting, the Strength value of the attacker is used to determine wounds rather than the Strength of the weapon itself. However, some weapons confer a bonus on the attacker's Strength. For example, Bretonnian Knights that are charging with lances receive a +2 bonus to their Strength. These bonuses are discussed together with other special rules in the section on Weapons. Combatants that are wounded have a chance to avoid suffering any damage if they are wearing armour, carrying shields or have a Ward save. This is exactly the same as described for shooting, and the same rules apply. |
|||||||||||||||||||||||||||||||||||||||||||||||||||||||||||||||||||||||||||||||||||||||||||||||||||||||||||||||||||||||||||||||||||||||||||||||||||||
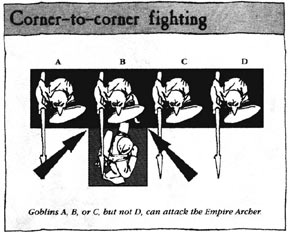 A
model can fight if its base is touching the base of an enemy model even
if it only touches at the corner. Even models attached in the side or
rear may fight. If you wish, they may be temporarily turned in the ranks
to indicate that they are doing so.
A
model can fight if its base is touching the base of an enemy model even
if it only touches at the corner. Even models attached in the side or
rear may fight. If you wish, they may be temporarily turned in the ranks
to indicate that they are doing so.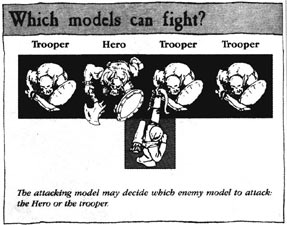 In
any case, models in base contact with the enemy may not choose to avoid
attacking their enemies.
In
any case, models in base contact with the enemy may not choose to avoid
attacking their enemies.