At the start of your Movement phase, the first thing you must do is declare which units will charge. Except in a few unusual circumstances explained later, you are never forced to charge. It is always your decision which units, if any, will charge the enemy. 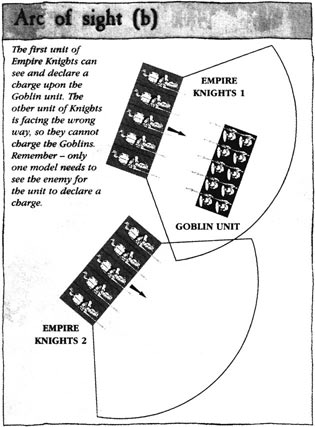
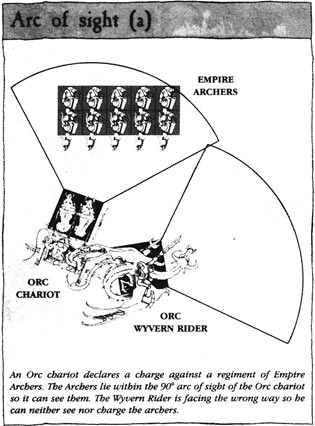
However, charging is the only way that models are normally allowed to move into close combat. If you want to attack an enemy then you must charge him you cannot simply move your model into close combat without declaring a charge first. All charges are declared at the start of your Movement phase, in any order you wish. To declare a charge, indicate which unit is charging and nominate one enemy unit that it is going to attack. For example, you might declare that your Empire Knights unit is charging your opponent's Orc Warriors unit. A unit may only declare a charge if at least one model in the unit can see at least one enemy model in the opposing unit. It is not necessary for every model to be able to see an enemy – the whole unit is able to charge the enemy so long as one model can do so. For line of sight see Facing, p41. Troops can only charge up to a predetermined distance – this is called a charge move and is explained later. When you declare a charge you must do so without measuring the distance to the target, you must rely on your estimate of the distance to ensure that your troops can reach their target. When deciding whether to charge you must also take into account any terrain that might slow you down, as described later. Deciding whether to charge or not calls for a good judgement of distances!
If the charged unit has missile weapons and the chargers are more than half their original charge move away, then troops can shoot at the chargers as they advance. For example, a unit of Knights with Move 7 can be shot at if they charge a unit of Archers that is more than 7" away, but cannot be shot at if it charges a unit 7" or less away. Work this out immediately before moving chargers - refer to the Shooting section for rules governing missile weapons (p.61). Treat stand & shoot responses which fail to hit the enemy because chargers are too close, etc, as a hold response instead. A unit can stand fast and receive the charge, representing individual troopers bracing themselves for the inevitable impact. This is the usual response of troops who do not have missile weapons or who are too close to the enemy to use them. Flee means just that – when your unit sees the enemy thundering down upon them, they turn tail and run! This is a rather desperate option as once troops begin to run they tend to carry on going, and may run away from the battlefield altogether, whether you want them to or not. As soon as a unit declares that it is fleeing, it is moved directly away from charging enemies by 2D6" if its Movement characteristic is 6" or less, or by 3D6" if its Move is more than 6". The fleeing unit is repositioned facing directly away from the chargers. Move the fleeing models immediately by the distance indicated by the dice roll. This is explained further in the rules for fleeing models in the Close Combat section. Having declared charges and charge responses, the player whose turn it is now has the opportunity to rally any of his units that are currently fleeing. Troops are normally forced to flee when they are defeated in close combat, if they are frightened by large monsters, or if they have suffered some other unusually traumatic experience. Fleeing troops are of no fighting value unless they can be rallied, which means they come to their senses and stop fleeing in readiness to fight once more. Because fleeing usually results from close combat the rules for fleeing troops can be found in the Close Combat section of this book. In the Rally phase of his turn, a player makes a test to determine whether his fleeing units manage to rally. If they rally then they remain where they are for the turn but may immediately adopt a new fighting formation facing in any direction. If the fleeing troops fail their Rally test and continue to flee then they are moved next along with other compulsory movement. After the player has attempted to rally any units that are fleeing, it is time to make any compulsory moves that the rules require. Generally speaking, a player can move his units how he wishes within the confines of the rules governing movement. However, sometimes troops go out of control for some reason, either because they are overcome by sheer terror, because they are compelled by magic, or because they are disorientated or confused. The player has no control over the movement of these troops and so these are referred to as compulsory moves. The most common kind of compulsory move is fleeing. Fleeing troops always first flee away from their enemy and in subsequent turns towards the nearest table edge, and they always move a randomly determined distance. All compulsory movement is done now before other movement takes place. This gives troops moving in this fashion the opportunity to get in the way, block lines of advance and do all sorts of other annoying things. Once any compulsory moves are complete, it is time for the player to move any units that have declared a charge. They are moved one at a time, in the order that the charges were declared. Chargers are moved towards their target in accordance with the movement rules given later. When troops charge, they move twice as fast as normal, representing a run or gallop, and this double speed move is called a charge move. For example, troops with a normal Move of 4" per turn have a charge move of 8". Sometimes you may find that your models are able to charge an enemy unit in the flank or rear. This is particularly good because an attack from an unexpected direction will sometimes throw the enemy into a panic and might give you an advantage in combat too. A charging unit's position at the start of the Movement phase determines whether it charges into the flank, the rear or the front of the enemy unit. If the charging unit is in the target's frontal zone when the charge is declared then it charges into the front. As units generally begin the game facing each other, this is the most common situation that will arise. However, if the charging unit comes from the flank zone, it charges into the side; if in the rear zone, it charges into the rear. See the diagrams below for more clarification. Once compulsory moves and charges have been resolved, it is time to move the rest of your troops. Generally speaking, you do not have to move troops at all if you do not want to, or you can move them as short or as great a distance as you like up to their permitted maximum move distance. The rules governing movement, the encumbering effects of weighty barding, hindering terrain, obstacles to movement, and maneuvering units around the battlefield are covered in the following section. |
 After
you declare your charges, but before you measure whether chargers are
within range, your opponent declares how each charged unit will respond.
A charged unit has three response options: stand & shoot,
hold, or flee. Units already engaged in close combat may
only hold.
After
you declare your charges, but before you measure whether chargers are
within range, your opponent declares how each charged unit will respond.
A charged unit has three response options: stand & shoot,
hold, or flee. Units already engaged in close combat may
only hold.