These are powerful and destructive weapons that lob large boulders into the air, sending them crashing through enemy ranks. Many races in Warhammer use these devices. Not all are built in the same way: some use a massive counterweight to catapult their missile into the air while others use torsion power like a giant crossbow. The bigger the engine, the larger the rock it can throw and the more damage it can do. The very largest stone throwers can hurl a projectile big enough to knock down buildings and even city walls!
Pivot the stone thrower on the spot so that it is pointing in the direction it is going to shoot. The crew do not need to be able to see their target, but they must see that there are enemy in the direction they are firing. Then declare how far the rock is to be fired. Do this without measuring the distance to that target, so try to guess the range as accurately as possible. Once you have made your guess, place the template directly over that spot where you have guessed. For example: A stone thrower is firing at a unit of Bretonnian Knights that are in front of the player. He makes his guess and declares that the stone thrower is firing 28" directly towards the centre of the Knights. He then measures 28" towards the target. If he has made a good guess the template will lie over its intended target. If not, there's still a chance the stone may veer off course and hit something. To decide whether the missile lands where it was aimed roll the Scatter dice and the Artillery dice. The Scatter dice is the dice marked with arrows on four sides and the HIT symbol on two sides. If a HIT is rolled then the missile lands exactly where it was aimed. If an arrow is rolled then the missile veers off in the direction shown by the arrow.
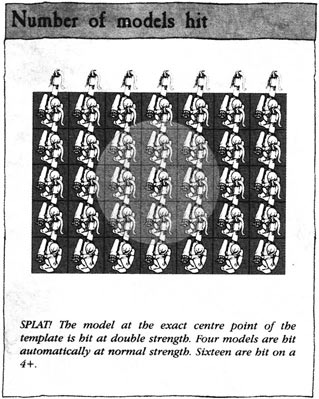
The Artillery dice is marked 2, 4, 6, 8, 10 and MISFIRE. If a Misfire has been rolled then something has gone wrong - roll a D6 and consult the Misfire Chart above. A Misfire roll automatically cancels out the whole shot regardless of the Scatter dice result. If a number on the Artillery dice is rolled then this is the distance in inches the missile veers off target as shown by the arrow on the Scatter dice. Move the template the distance indicated in the direction shown by the arrow. If a HIT has been rolled then the numbers are ignored; a number simply indicates that the shot has not misfired. For example: The player guesses bang on and the template lies directly in the middle of the chosen target. He then rolls both dice. The Scatter dice shows a HIT! It has landed right on target. The Artillery dice score is 4 - the number indicates that nothing is amiss and the shot lands exactly cohere it alas aimed. If the Artillery dice had been a MISFIRE then the whole shot would have been messed up as described on the Misfire chart. Once it is established where the stone lands damage can be worked out. Any model that lies completely under the template is hit automatically - models whose bases lie partially under the template are hit on a 4+. See the diagram above for details. You will have to use your judgement and common sense to decide exactly which models lie under the template - sometimes it is not easy to judge precisely. Once it has been worked out which models are struck, work out damage in the usual way. Roll for each target to see whether it has suffered damage. Stone throwers have a Strength of 4 or more, so they cause damage on the roll of a 3+ or 4+ against most human or similarly sized targets. Refer to the To Wound chart for details. A damaging hit from a stone thrower causes D6 wounds, but as most creatures have only 1 Wound it is not necessary to take this dice roll. It is, however, useful when attacking characters and big monsters. Any single model which lies directly at the centre of the template suffers 1 automatic hit at twice the stone thrower's usual Strength - the stone lands directly on top of that model. This means that a stone thrower can potentially slay even a large monster or a powerful character. No armour saving throw is permitted against wounds from a stone thrower. When a big rock lands on you, you are squashed regardless of what armour you may be wearing! Ward saves may be taken as normal. Stone throwers vary in design - some are much bigger than others, whilst some may be positively monstrous! However, most stone throwers use the following profile:
Being large, solid devices, stone throwers are difficult to destroy. However, it's possible for them to become the target of other engines of war or they may be attacked by large monsters. Stone throwers therefore have a profile like a creature with a Toughness value and a number of Wounds which they can sustain before they are destroyed. As with other details, these might vary in specific cases, but a typical engine has the values shown here. The Movement rate is the speed which the stone thrower can move with its full crew - if any crew are slain then its speed is reduced proportionally. A machine cannot move and shoot in the same turn except to turn to face its target. Generally speaking, war machines have such a long range that it is pointless moving them about. A stone thrower requires a full crew to work it properly - to carry stones, push the machine round to bear on its target, and so on. If one crewman is slain then the rest can just about get by without slowing up the machine noticeably. If two or more crewmen are slain then the remaining crew will be unable to cope and the stone thrower will have to miss a whole turn before it can shoot again. This is in addition to any penalty imposed by a Misfire result. Obviously, the engine requires at least one crewman to work, so the machine will become useless should they all be slain.
Work out hits as normal. Models are allowed no armour saving throw from a stone thrower. |
||||||||||||||||||||||||||||||
 Work
out the results of stone throwing in the Shooting phase. To work out
damage you will need the small 3" round template. The stone is
not as big as the template of course (that would require a very large
engine indeed) but it shatters on impact sending shards of sharp stone
over a wide area.
Work
out the results of stone throwing in the Shooting phase. To work out
damage you will need the small 3" round template. The stone is
not as big as the template of course (that would require a very large
engine indeed) but it shatters on impact sending shards of sharp stone
over a wide area.