|
How good creatures are in close combat depends almost entirely on their physical characteristics, in other words how fast, strong, tough and ferocious they are. Armour remains useful for warding off blows and shots, but ranged weaponry becomes a secondary consideration - the best gun in the galaxy won't help if your opponent is bashing your brains out with a rock! In close combat, both players' models fight. How many blows are struck and who strikes first is detailed opposite. The rules are written assuming that there is only a single close combat occurring in the turn, though of course there may be several separate assaults being fought simultaneously in different parts of the battlefield. If this is the case, the player whose turn it is can choose what order to resolve the combats in. completing each combat before moving on to the next combat. WHO CAN FIGHT?Close combat is a swirling melee of troops leaping, spinning, hacking and slashing at one another. As well as fighting hand-to-hand, warriors will be firing at point blank range at any target that presents itself. The following models in a locked unit are said to be engaged in cymbal and can fight at full effect:
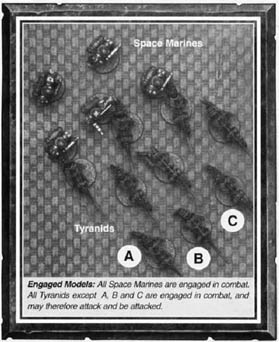
All engaged models fight with their full number of attacks and count the benefits of any special close combat attack forms they have. These are the members of the unit that can attack the enemy and be attacked by them. When determining which Weapon Skill and Toughness values count for the majority, and which models can be taken as casualties, only the engaged models are counted. The rest of the unit is Locked and is subject to the outcome of a close combat. They may pile in later to, help their comrades, but only the engaged models can actually contribute to the fight.
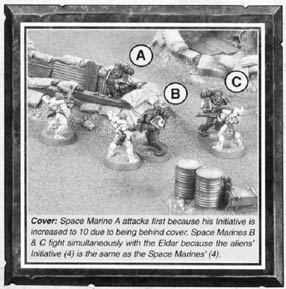
It's all in the reflexes when it comes to close combat - slow, lumbering opponents can be quickly dispatched by a faster and more agile foe. Unfortunately, many cumbersome opponents, such as Orks, are tough enough to be able to withstand a vicious pummelling and still come back lor more. In close combat, a model's Initiative characteristic determines who fights first. Work your way down the Initiative scores in the combat, starting with the highest and going down to the lowest. Models make their attacks when their Initiative is reached, assuming they haven't already been killed by a model with a higher Initiative. A model will only fight if it is still engaged when its Initiative rank is called. If both sides have models with the same Initiative, attacks are made simultaneously. For example, a squad of Space Marines (Initiative 4) including a Veteran Sergeant with power fist (Initiative 1) is charged by a brood of Genestealers (Initiative 6} and a Carnifex (Initiative 2). The Genestealers strike first at Initiative 6, followed by the Space Marines at 4, then the Carnifex at 2 and the sergeant striking last at Initiative 1. COVERTroops who are defending in cover have a massive advantage in an assault. They can fire from their hiding place at the approaching enemy and then smite them as they struggle to get to grips with their foe. Models that are charged while they are in or behind cover normally fight in close combat with an Initiative value of 10. This represents the advantage of cover -their improved Initiative accounts for not only close fighting but also shots against the enemy as they charge in. However, the cover does not affect hits or anything else in an assault. After the first round of close combat, fighting is assumed to have swept into the cover, so no further advantage is gained by models in it. Note that cover advantage applies only to models in cover that are being charged. Some units count as being in cover all the lime because of psychic abilities or weird force fields, but these are of no benefit if the unit itself charges. Sometimes, a model with only count as being in cover if assaulted from a specific direction from which the cover has an effect, eg. a Space Marine behind some oil drums is in cover if assaulted over the oil drums, but not if assaulted from the rear. If, before any assaulting models are moved, a direct line from the assaulting model to the enemy model passes through the cover then it is assumed to be enough of an obstruction to count. This expedient is used to ensure attackers can't 'run around' cover to negate its effects.
ATTACKS Attacks in close combat work like shots in shooting - each attack that hits has a chance to wound. The wounded model gels a chance to save, and if it fails is (generally) removed as a casualty. Each engaged model strikes with the number of Attacks (A) on his characteristics profile. In addition, the following bonus attacks apply: +1 Charge Bonus: Engaged models who launched the close assault that turn (ie. charged) get +1 Attack on their normal profile for that turn only. +1 Two Weapons: Engaged models with two single-handed weapons (typically a close combat weapon and/or pistol in each hand) have an extra -t-1 Attack for every turn of close combat, including the first. Models with more than two weapons gain no additional benefit - you only get one extra Attack regardless of whether you have two or more single-handed weapons. Example 1: A unit of five Space Marines with bolters would roll five D6 for their attacks in close combat. If they were charging they would roil ten D6 (1 Attack +1 each lor charging). Note that the Space Marines could not charge if they had used their bolters in the Shooting phase, as they are rapid fire weapons. Example 2: A unit of six Hormagaunts with scything talons (two close combat weapons) would roll twelve D6 for their attacks (1 attack +1 for two weapons). If they were charging they would roll eighteen D6 (1 Attack +1 each for charging +1 for two weapons = 3 each). ROLLING TO HITTo determine whether hits are scored roll a D6 for each Attack a model gels to make. The dice roll needed to score a hit on your enemy depends on the relative Weapon Skills of the attackers and their foes. Compare the WS of the attackers with the WS of their opponents and consult the To Hit chart to find the minimum score needed on a D6 to hit. Attacks should be rolled together where the same To Hit roll is needed, as this saves time and speeds up the game. In the example above, the Space Marine player would therefore roll all of his ten attacks together. UNITS WITH DIFFERENT WSMany units in Warhammer 40,000 contain models with different Weapon Skill values. Attacks against a unit are resolved using the Weapon Skill of the majority of the engaged models. If there is no majority Weapon Skill, use the lowest Weapon Skill of the models engaged. For example, a mob of 20 Grots (WS2) led by an Ork Slaver (WS4) are all engaged in a combat. While the Grots are in the majority, attacks against the unit are resolved using their WS of 2 - however skilled the Slaver is, he can't prevent the Grots getting hit in the first place. When the models attack, they calculate their own To Hit values based on their individual Weapon Skill, so, when the Grots and Slaver mentioned above attack their enemies, the Grots' To Hit value will be based on a comparison of their WS2 against the enemy's WS, and the Slaver on a comparison of his WS4 and the enemy's WS. WHO IS HIT?We assume that the warrior is contributing his shots and blows to the swirling combat going on. This means we don't have to worry about whether an individual model strikes its respective opponent in base contact. When a unit inflicts hits, it may only affect enemy models that are engaged. These are the only enemy models able to strike back, so it is reasonable that these are the only ones who can be hurt. ROLLING TO WOUNDNot all of the attacks that find a mark will harm the enemy. They may be deflected by equipment, parried at the last moment or merely inflict a graze or flesh wound. As with shooting, once you have scored a hit with an attack you must roll again to see if you score a wound and incapacitate your foe. Consult the Damage chart, cross-referencing the attacker's Strength characteristic (S) with the defender's Toughness (T). The chart indicates the minimum value on a D6 roll required to inflict a wound. WHAT STRENGTH TO USEIn almost all cases, when rolling to wound in close combat, use the Strength on the attacker's profile regardless of what weapon they are using. Some (but not all) close combat weapons may give the attacker a Strength bonus - this is explained in Special Close Combat Attacks. In a unit containing models with different Strength values, roll their attacks separately (they'll quite often have different Initiative characteristics too). So, for example, in a unit containing Grots and an Ork Slaver, the Grots' attacks are made with their puny Strength of 2, but the Slaver's attacks use his more macho Strength of 3. DIFFERENT TOUGHNESSESIf the unit being attacked contains models with different Toughness characteristics, use the Toughness of the majority of the engaged models. If there is no majority, then use the lowest Toughness among them. To continue the example above, the engaged Grots (T2) and Ork Slaver (T4) will suffer To Wound rolls using the Grots' meagre Toughness as long as they are in the , majority. Once again, remember that this is figured at each Initiative step - if the unit was whittled down to just the Slaver remaining, the attacks at the next Initiative will be resolved at the Toughness of the Slaver. ARMOUR SAVESModels struck and wounded in close combat can attempt Armour Saves to avoid becoming casualties. Models usually get to save regardless of the attacker's Strength, but some especially monstrous creatures and powerful close combat weapons will punch straight through armour. If a unit takes enough wounding hits in one Initiative step to cause one or more wounds on every engaged model, the attacking player nominates one engaged model to make the first save. After this, all other Saving throws are made normally. Cover does not provide protection in close combat as it does against shooting. This means that models do not get Cover Saves against any attacks made in the Close Combat phase. Remember that models are allowed to make Invulnerable Saving throws even if Armour Saving throws would not normally be allowed. It the rules for a weapon or attack states that no Armour Save is allowed then only an Invulnerable Save may be made. Some especially exotic attacks may even ignore Invulnerable Saves (but not necessarily Armour Saves), and where this is the case it is noted in the appropriate Codex book. As noted in the Shooting section, with a unit of multi-Wound creatures, whole multi-Wound models must be removed as casualties wherever possible. SUFFERING WOUNDS & REMOVING CASUALTIESAll the rules (or removing shooting casualties apply in close combat, in addition to the following: When a unit inflicts wounds, they may only affect engaged enemy models. The player suffering the casualties selects which models die from those engaged. Casualties must be removed in such a way that the unit maintains coherency wherever possible. This represents the way that a unit can be whittled down to a tight knot of combatants. It is possible that casualties may exceed the number of engaged models, in which case the surplus wounds are discarded. The check on which models are engaged is made at the start of each Initiative step, so some models may lose their opportunity to attack if all engaged enemies are slain at an earlier Initiative step - the unit has already slain everyone it can reach. If a model becomes a casualty before it has an opportunity to attack, then it may not strike back. When striking blows simultaneously, you may find it more convenient to resolve one side's attacks and simply lie wounded models on their side to remind you that they have yet to attack back.
|
|||||||||||||||||||||||||||||||||||||||||||||||||||||||||||||||||||||||||||||||||||||||||||||||||||||||||||||||||||||||||||||||||||||||||||||||||||||||||||||||||||||||||||||||||||||||||||||||||||||||||||||||||||||||||||||||||||||||||||||||||||